These past two weeks I have been working on my belly-dance choreographies, college apps (bleh) and best of all, some sweet belly-costumes... half sewn, half hot-glued. But since they aren't yet finished I will have to post two other great belly-dance costume substitutes. JoEllen Elam or Lillyxandra is an amazing costume designer, who sometimes lets us in on her secrets on her blog at fireflypath.com. The pictures below link to her instructions on making sweet sweet under the sea belly-dance bras that could easily be modified.
This green bra would only need a small shell tassel or some beads strung in half-circles in the middle to transform it into a dance costume. If you follow the links on the pictures you can see how JoEllen had covered the bra with lace, appliques and silk. Now imagine this in pink, red, orange, purple, anything... it would still look divine and not even necessarily mermaid like.
This next one would be a little harder to modify, but a little easier to make. If you use more ruffles all through out, or add a ton of small flower appliques evenly through out the middle however you can transform it into a perfect belly dance bra as well. This one might even look better with some fringe strung across the bottom!
If you look close, you will notice that the edges on the fabric didn't even need to be sewn in, they were just burned in an intricate, random pattern!
One last reminder for those two awesome tutorials that I hope you dancers checked out. These would require halter straps for safety if you wish to dance in them, and the straps have to be covered!

Showing posts with label costumes. Show all posts
November 12, 2010
November 5, 2010
Halloween Wrap Up!
Amidst all the college apps, flu, and missed school I have managed to complete 2 full costumes and help out with four more! I think my new talent is specifically the demon wings below seeing as they managed to help their wearer get second place in a costume contest!
And of course my own costume (which I of-course forgot to take pictures of) featured these fun boots!
The boots were actually very simple to make and probably cost me $1-$3. They began looking more like this:
They were very old, and very crappy (the ones no one really wants at a second hand store)! So I took some purple paint... and added some very simple swirls, and then hot glued the sparkles on to the troubled spots.
To fix everything in place I went over with some fabric glue, and now they seem to stay on! I think I might do this with some more of my really bad shoes.
So to wrap up the Halloween... I hope your costumes worked out and lets move on to better things-- how about Belly Dance costumes and Christmas decoration!
And of course my own costume (which I of-course forgot to take pictures of) featured these fun boots!
The boots were actually very simple to make and probably cost me $1-$3. They began looking more like this:
They were very old, and very crappy (the ones no one really wants at a second hand store)! So I took some purple paint... and added some very simple swirls, and then hot glued the sparkles on to the troubled spots.
Sparkles and Gemstones!
To fix everything in place I went over with some fabric glue, and now they seem to stay on! I think I might do this with some more of my really bad shoes.
So to wrap up the Halloween... I hope your costumes worked out and lets move on to better things-- how about Belly Dance costumes and Christmas decoration!
Labels:
accessories,
costumes,
Halloween,
how to,
wings
October 29, 2010
Halloween Cram!
So if you are still busy and you don't have a halloween costume, you can try superfast Candy Fairy costume. Not only is it fast, but it is made of materials almost anyone can find at home!
You will need:
You will need:
- cardboard
- a small piece of wire
- glue (preferably hot glue)
- Paint
- Cellophane/tissue paper/wrapping paper/
- Candy wrappers, ribbons anything shiny
- Make a wire loop (14-16 gauge)
- Cut circles out of cardboard (1 inch, 2 inch, 3 inch diameter)
- Paint or cover the circles in cellophane/tissue/wrapping paper
- glue a big circle on to the sides of the wire loop
- attach the other circles to the big circle
- add ribbons, sparkles, or leave as is
- Give yourself a round of applause!
October 27, 2010
Demon Wings with Welding
I found this interesting technique on instructables.com. Not only is this the only pair of wings that could truly appear evil, but ethernight is also very original... so far this is the only tutorial using welding!
Quite impressive: instruction can be found here!
October 23, 2010
DIY Feather Wings
I have been fortunate enough to come by several more fairy wing techniques that are different from the stocking wings I've shown before!
Not only are these wings great for pink and fluffy angels, but I can also imagine that some black or red feathers could transform any costume into a true fallen angel. Instructions are found here!
October 22, 2010
DIY Halloween Costumes
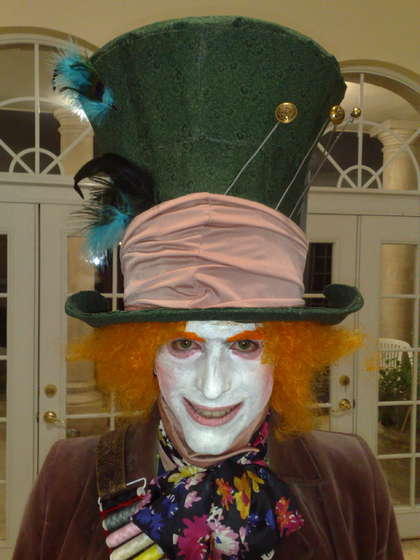
So I went looking for cheap, DIY, crazy Halloween costume ideas and this is what I found.
The instructions to this crazy piece can be found at http://www.instructables.com/id/Burtons-Mad-Hatter-Hat/
Labels:
accessories,
costumes,
craft,
DIY,
fairy,
headpieces,
how to
October 15, 2010
Fairy Costumes-Stockings and Wire
Are you sure you want to delete this post? This action is permanent.
Yes, delete post
No, keep post
I know some of you like to buy your costumes, while others like to make them. Here are some ideas for great fairy costumes. Having done a lot of research and projects in the field, I can sincerely recommend the following instructions:
Simple Black- From Threadbanger
Best I've Seen by Emilie Autumn
These are more simple, but are also very sturdy and pretty.Fancy Fairy The strap and wing attachment is very clever and I prefer this one because you can tie it under your costume for that "invisible" look. Plus it doesn't chafe.
Have fun with the costumes. I'll be back with some more fun ideas for Renaissance and Halloween costumes later. Thanks.
Love the Mascareri!
Are you sure you want to delete this post? This action is permanent.
Yes, delete post
No, keep post
For the past 2 years I have occasionally toyed with the idea of learning traditional Arte dei Machereri, or the art of mask making. The origins of this beautiful art are of course in Venice, but the repercussions of this art can be seen in everything from Mardi Gras to modeling and marketing.
So far I have created four successful masks, and several more that were complete and total failures. You can see some of my masks painted into one of the still life's that I have done in the Paintings section. Below are several do and don'ts when it comes to mask-making.
DO:
- Use an exacto knife
- sandpaper around the edges
- PLAN it out a little bit
- paint the back of the mask
- use very thin and tiny strips of paper on your last layer for a more delicate and smooth look
- use beads, sparkles, fabric around the edges if they are rough
- reinforce the area around the nasal bone with a lot of paper
Don't:
- Pile on many many layers at once, let it dry a little then add some more
- Forget the sandpaper
- Take the mask off the form before it is completely dry
- forget the glaze (modge pogde or collage podge works fine)
Subscribe to:
Posts (Atom)