Showing posts with label craft. Show all posts

December 1, 2010

Sweet Paper Decorations

Since I can't ever let go of anything colorful, my basement is filled with catalogs and magazines that I don't have the heart to throw away. I've been using some to create my bangles and paper beads but obviously that can't possibly catch up with the speed of mail delivery. So I found these three awesome tutorials that others like me can use to make pretty things out of paper!


These beauties are actually really simple and I can't wait to make a ton to decorate Christmas presents! The tutorial can be found at How About Orange!

Martha Steward went for something much more simple, but still pretty clever! Since my mom gets christmas card catalogs at her work this might be very useful! You can find the tutorial here in case its not too obvious :-)
These roses by T. Matthewes are indeed a fine art, I am already tracing spirals on my magazines!! Check his sweeeeeeeeet sweet blog here!

November 25, 2010

Fabric Scrap Bracelets

Hah! just discovered another cool recycled bangle bracelet idea! Check these out... First... Jungle Fever

Black Crow bangles and neclace
Warm and Fuzzy
 Jewel Box
 and last but not least... Vicious Red

All in all they were much much easier to make than the recycled paper bangles. I also got to use the fabric scraps, left-over beads, and yarn pieces I've accumulated over the years... I can also use these for belly dancing costumes, and I have some on my etsy  I'll have tutorial soon!

November 21, 2010

Recycled Flower Earrings

I finally took out that whole bag of plastic bottles from homecoming (we made them into gum drops) and decided to set some things straight.Once again I resumed my studies of plastic, this time with the correct tools... my super amazing wood-burner which burns holes through anything (especially plastic) in a matter of seconds, a real diagonal cutter and wire! Last time, I had to use pliers to hold my plastic flowers over a stove and I burned my hand... I also painted the plastic with nail-polish and the smooth nail-polish chipped off. Plus, I burned the hole in the flower after I painted it which resulted in a discoloration.  This time... I successfully made these


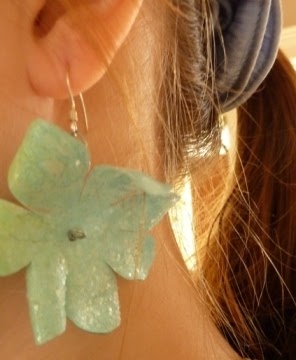
 The original bottles were already spray painted and covered in sparkles... but unfortunately not very uniformly.


As can be seen from the closeup... I'll keep working on them. But here are some plastic-flower making tips!
  • burn/cut the holes first!
  • practice with spray-paint, nail-polish or acrylics first, before you have a shape you like
  • don't burn yourself!
Ill have a real tutorial as soon as I feel like I've mastered the craft enough! Thanks!

November 16, 2010

Paper Jewelry

Many of you have probably made paper jewelry in the past, but did you ever make paper jewelry you'd wear? I definitely hit it off quite well with my paper-mache bangles, and recently made this matching set! I'm so excited....
This necklace has four beads, lots of chain and one pendant!


I made it to match the bracelet I sold earlier....

October 29, 2010

Halloween Cram!

So if you are still busy and you don't have a halloween costume, you can try superfast Candy Fairy costume. Not only is it fast, but it is made of materials almost anyone can find at home!
You will need:
  • cardboard
  • a small piece of wire
  • glue (preferably hot glue)
  • Paint
  • Cellophane/tissue paper/wrapping paper/
  • Candy wrappers, ribbons anything shiny
Here are the steps:

  1.  Make a wire loop (14-16 gauge)
  • Cut circles out of cardboard (1 inch, 2 inch, 3 inch diameter)
  • Paint or cover the circles in cellophane/tissue/wrapping paper
  • glue a big circle on to the sides of the wire loop
  • attach the other circles to the big circle
  • add ribbons, sparkles, or leave as is
  • Give yourself a round of applause!
To add to the costume, grab a bag of candy, eat it and leave all the wrappers in the bag.... then have a friend dress up as the tooth fairy!

October 27, 2010

Demon Wings with Welding

I found this interesting technique on instructables.com. Not only is this the only pair of wings that could truly appear evil, but ethernight is also very original... so far this is the only tutorial using welding!

Quite impressive: instruction can be found here!

October 23, 2010

DIY Feather Wings

I have been fortunate enough to come by several more fairy wing techniques that are different from the stocking wings I've shown before!


 Not only are these wings great for pink and fluffy angels, but I can also imagine that some black or red feathers could transform  any costume into a true fallen angel. Instructions are found here!

October 22, 2010

DIY Halloween Costumes

So I went looking for cheap, DIY, crazy Halloween costume ideas and this is what I found.


The instructions to this crazy piece can be found at http://www.instructables.com/id/Burtons-Mad-Hatter-Hat/

October 15, 2010

Fairy Costumes-Stockings and Wire

Edit | Settings | Delete
I know some of you like to buy your costumes, while others like to make them. Here are some ideas for great fairy costumes. Having done a lot of research and projects in the field, I can sincerely recommend the following instructions:

Simple Black- From Threadbanger


Best I've Seen by Emilie Autumn


These are more simple, but are also very sturdy and pretty.Fancy Fairy The strap and wing attachment is very clever and I prefer this one because you can tie it under your costume for that "invisible" look. Plus it doesn't chafe. 
Have fun with the costumes. I'll be back with some more fun ideas for Renaissance and Halloween costumes later. Thanks.

3 Recyclable Ideas


  • Sometimes ideas just pop into my head, but I can not realize them due to time issues. I've always loved junk art, vintage and eco-conscious creations. So here are 3 ideas--I hope you find them use-full.


  • The ideas come from rummaging around in the recycling!
  • Picture

  • Plastic and paper shapes can be turned into pendants and jewelery. For instance, that little yogurt box can have the bottom neatly cut out to make a great round pendant.


  • But some more skilled craftsmen have gone further in converting plastic and paper to decoration. Gulnur Ozdaglar  has created these marvelous pieces!

  • Picture

  • Picture

  • I also found a variety of interesting cardboard and plastic boxes. With the right skills they can be decoupaged, infused with dyes, covered in mosaic, or-- if you got what it takes- cut and carved.
    The cardboard ones can also be covered in tissue paper and used to give gifts, keep jewelry, or ship items if you sell them on e-bay or etsy.

  • Picture

  • Family Fun- displays this one!

  • Picture

  • For cheaper scrapbooking or beautiful decoupage! Try some old cards. My mom keeps lots out of sentimental value and sometimes because they are really pretty. What a better way to utilize the cards then to cut out the beautiful shapes or words and glue them to beautiful photo-pages or boxes. Or some of the cards can even be used as background papers.
  • Picture

Making Bangles 1

If you don't know what constitutes eco-friendly art, try Collages. A great Eco-friendly collage can be made over a large cardboard, wood, or paper surface. The fashion for big bangles is a perfect source for inspirational green-ness! Here is what I do!

A can wrapped with duct tape-- approximately the width of the bracelet I want!
Picture
After placing layers upon layers of strips of paper, cardboard, newsprint and glue on I cut the long band in half to take it off, and then in half to get two separate bracelets.
The bracelet is glued back together and several more layers of paper is placed on top-- sand-papered and ready to roll!
Picture
As an alternative- you can buy pre-made wooden bangles at a store!
Picture
In order to make each one unique and eco-friendly I do the following:
  • Use unused materials (old silk flowers, fabric, scrapbook paper scraps)
  • Recycle- newspaper, catalogs, magazines
  • And-- use up buttons, beer-caps, birthday cards, goody-bags and anything else that would otherwise have no use!
Here are some of my designs

Love the Mascareri!

Picture
For the past 2 years I have occasionally toyed with the idea of learning traditional Arte dei Machereri, or the art of mask making. The origins of this beautiful art are of course in Venice, but the repercussions of this art can be seen in everything from Mardi Gras to modeling and marketing.
Picture
Picture
So far I have created four successful masks, and several more that were complete and total failures. You can see some of my masks painted into one of the still life's that I have done in the Paintings section. Below are several do and don'ts when it comes to mask-making.
DO:
  • Use an exacto knife
  • sandpaper around the edges
  • PLAN it out a little bit
  • paint the back of the mask
  • use very thin and tiny strips of paper on your last layer for a more delicate and smooth look
  • use beads, sparkles, fabric around the edges if they are rough
  • reinforce the area around the nasal bone with a lot of paper
Picture
Don't:
  • Pile on many many layers at once, let it dry a little then add some more
  • Forget the sandpaper
  • Take the mask off the form before it is completely dry
  • forget the glaze (modge pogde or collage podge works fine)